Floating Row Covers? Let’s Learn How!

I just uploaded a new video documenting how to make and install floating row covers.

Supplies you will need:

  • Rebar – 3/8″ x 10′, cut into 5 – 2′ lengths
  • Electrical PVC – 1/2″ diameter pipe x 9′
  • Floating Row Cover fabric
  • Angle Cutter or equivalent for cutting lengths of rebar
  • Hack Saw or PVC Pipe Cutter
  • Gloves and Safety Glasses

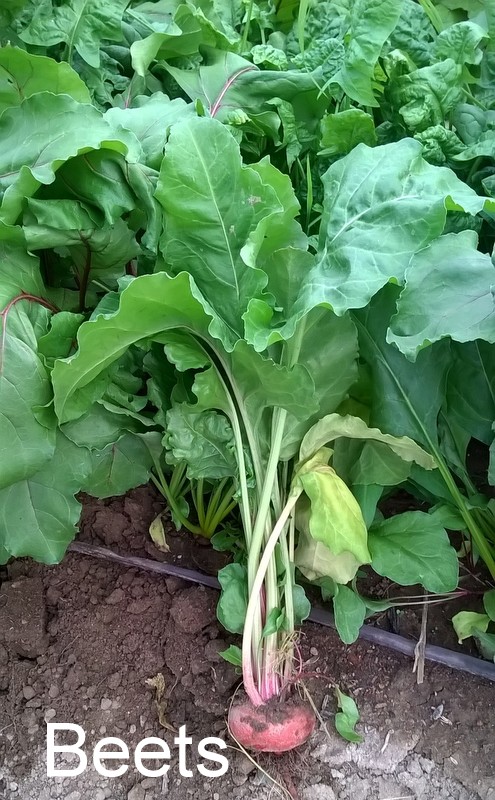
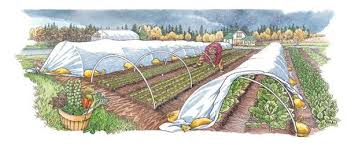
Low tunnels using floating row covers is of great benefit  for several reasons.

  • Floating row cover is a light weight, breathable fabric that allows air, moisture and sunlight to pass through the material.
    • There are various fabric weights to meet different needs.
      • Agribon 15 is lightweight fabric that is used for insect protection and shading.
      • Agribon 50 is a heavy cloth used for freeze and frost protection. This cloth will protect a crop down to 26° (F)
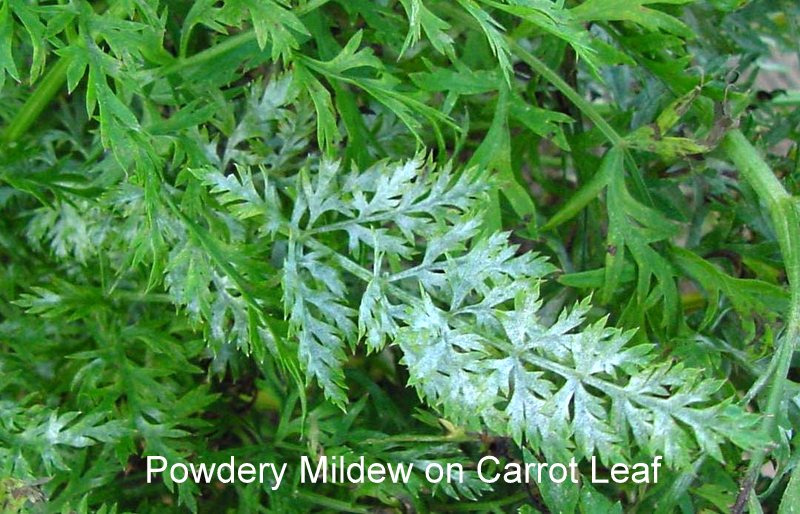
  • Insect protection – when properly sealed, insects cannot penetrate the covering which protects the crop from damage and disease.
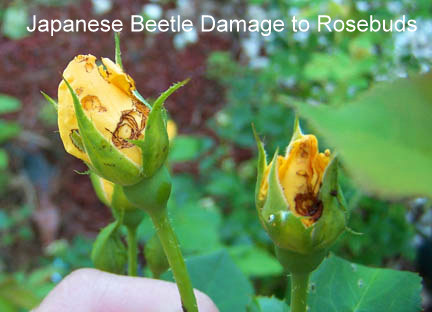
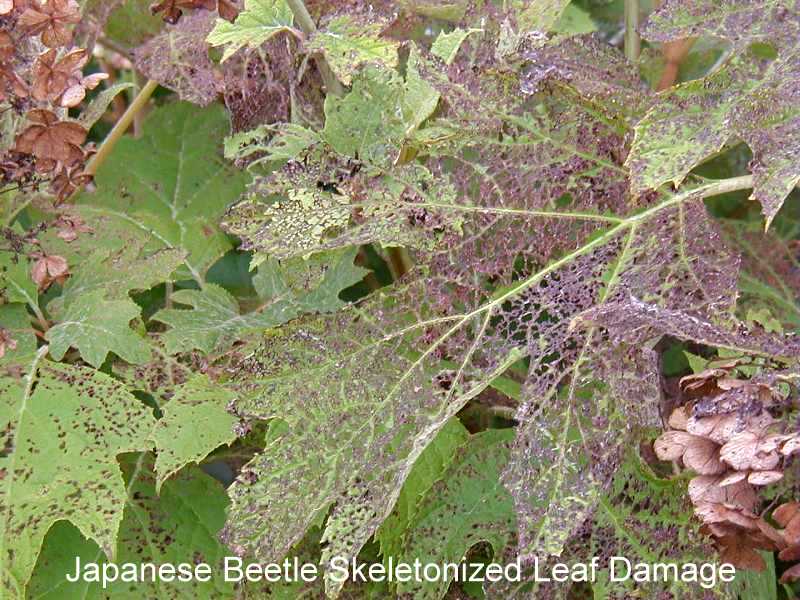
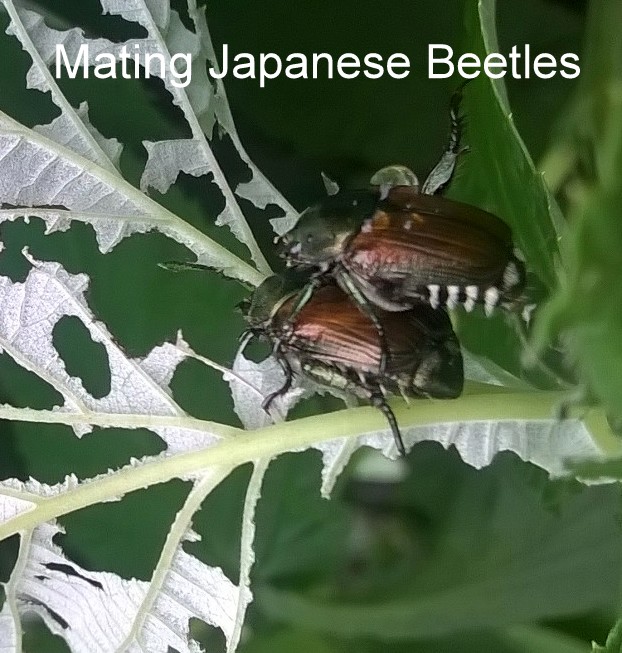
    • Problem insects such as Japanese beetle, squash bugs, squash vine borer, cucumber beetles and flea beetles are blocked from doing their usual mayhem.
  • Isolation chambers – Low tunnels are ideal for seed saving of crops such as squash, pumpkin, melons and watermelons. Bumble bee hives may be inserted at one end of the enclosure to insure proper pollination. Plus, there is not a chance of cross pollination. You may grow several varieties side by side. That is a huge advantage.
  • Season extension – row covers placed over a crop will allow for early planting by trapping 2° – 8° (F) higher temperature. Likewise using a row cover late in the season will protect the crop from early frost. By using this method you can easily extend your growing season by one month!!!!
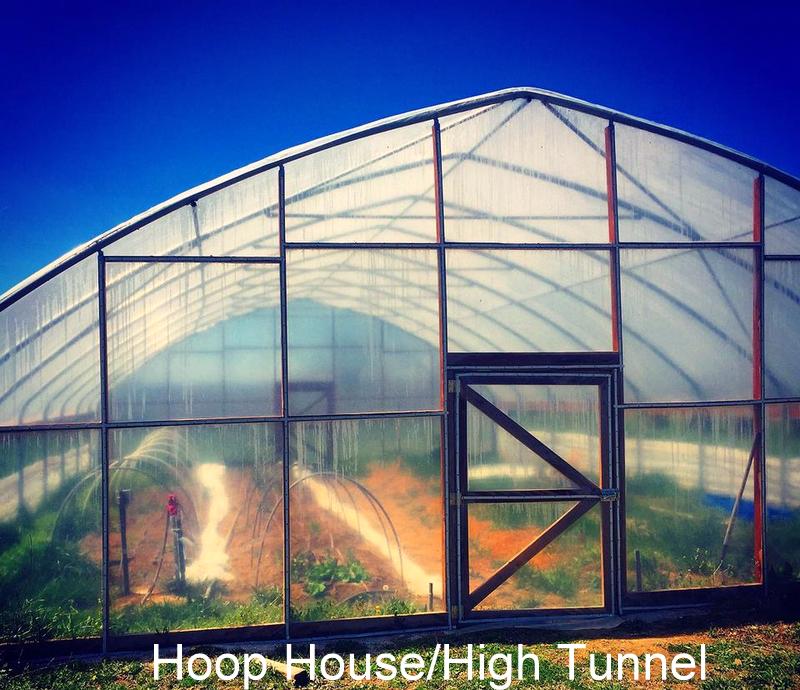
  • Hoop houses, high tunnels and greenhouses – row cover gives added protection and benefits the grower with lower fuel costs. The insulatory value of the row cover will block some of radiant cold that may damage a crop.

This is another method and tool for your gardening arsenal!!!

Papa

Little or No Flower Heads On my Broccoli! Huh?

I’ve grown broccoli for the last two years and all I get are huge plants with either little or no flower heads. What seems to be the problem?Broccoli

Timing is key!! Broccoli likes to stay cool.

Causes of no or poor flower heading:

  • Alternating periods of abnormal high temperatures followed by abnormal low temperatures stresses the plant  and causes heading to come to a complete halt.
  • Stress brought on by drought or inadequate moisture.
  • Excessive nitrogen can cause huge healthy plants with little or no head production.
  • Transplanting too late with root bound plants will keep the broccoli from heading.
  • Transplants when exposed to temperature of 40 degrees and below for 1 – 2 weeks triggers heads to form too early or not at all.
  • Transplants not properly hardened off will be stressed and perform poorly. http://papasgardens.com/2015/04/24/what-does-it-mean-to-harden-off-seedlings/
  • Overcrowding results in either little or no head formation due to competition for adequate water and nutrient.

Prevention:

  • Proper timing of transplanting for your specific area. Your County Cooperative Extension Service will supply the dates for planting.
  • Proper planting of transplants 2 feet apart.
  • Even supply of moisture. Drip irrigation is best.
  • Balanced nutrition/fertilization. Avoid excessive applications of nitrogen.
  • Proper hardening off of transplants.
  • Cover planting when temperatures drop below 50 degrees. Low tunnels with floating row cover or cloches will provide protection. Drawing low tunnels
  • plastic-bottle-clochesPlant in Fall.
    • Decreased pest pressure.
    • Plants are usually stronger. The flower heads are bigger.
    • Plants grow better into cooler weather.
    • Sow seeds for transplants 10 – 12 weeks before first frost.
    • Set transplants 2 feet apart for extended season planting.

Broccoli are sensitive to their environment. When treated with care, they will reward you!

Papa

Skeletonized Leaves? Rosebuds with Chewed Petals? = Japanese Beetles (Popillia japonica Newman, 1841)

These beautiful creatures have metallic green bodies with copper colored wings. They are 3/8 inch long and 1/4 inch wide. Japanese beetles are quite unique!

beetle - Japanese Beetle (Popillia japonica) [MO 06]

It is amazing the damage these imported invaders can do!

WP_20150616_09_21_40_Pro       beetlerose

This is damage from one or two beetles. Imagine what a few dozen can do!

OLYMPUS DIGITAL CAMERA

Japanese Beetles (Popillia japonica Newman, 1841) came to our shores in 1912 on Japanese iris.

Stages of development are as follows:

  • Egg
  • Larvae (white grub)
  • Pupae (grub transforms into a cream colored/reddish brown cocoon)
  • Adult beetle emerge from soil May through June. It is a voracious eater for 30 to 50 days.
    • Once emerged it searches for food sources.
    • A pheromone (a scent produced by Japanese beetles to attract other Japanese beetles) is sent out to help other Japanese beetles find the food source.
    • Mating is soon to occur.
    • WP_20150616_11_41_10_Pro
    • Females feed for a few days on a plant food source and burrow 3 inches into the soil to lay eggs.
  • Once the eggs are laid the females emerge again to feed, mate and lay eggs again.
    • This cycle is repeated until their season is over, laying upwards to 40 to 60 eggs.
  • Eggs develop depending on soil temperature. The warmer the soil the quicker larval development.
  • Once they are larvae, they move upwards in the soil to feed on organic matter and roots.
  • Soil cooling moves the larvae (grubs) deeper in the soil for winter.
  • Soil warming moves the grubs upwards in the soil where they pupate and transform into an adult Japanese beetles and their life cycle begins again.

japanese beetle life cycle

The most effective natural control of Japanese beetles is daily, hand picking early in the morning as the beetles are lethargic.

  • Your arsenal of weaponry includes a bucket, soapy water and vigilant monitoring daily!
    • Early detection of the scout Japanese beetles is key to this strategy! This will reduce the following years population!!!
  • Place the bucket under the infested plant. Shake the plant and the beetles will fall into the soapy water.
    • Hand pick any beetles not falling into the bucket of soapy water.
  • This action reduces the pheremones of the exploratory first wave of Japanese beetles. This must be done daily!!
  • Leave the beetles to die and decompose in the bucket of soapy water. The odor of dying and decomposing beetles in the soapy water will repel/deter additional beetles from invading your area. (Many thanks to The Herb Gardener for this insight)
  • Place the bucket(s) near areas of previous Japanese beetle attack.
  • Insecticidal soap applied directly to the beetle will cause its demise.
  • Lemon dish soap sprayed directly on the beetle is another effective way to kill these pests!

Prevention: Kill grubs in the soil which turn into the Japanese beetle.

  • Milky Spore Disease (Bacillus popillae) will kill grubs but will take up to a year to inoculate the soil. This inoculation will last up to 10 years in the areas of heavy, consistent infestations.
    • Milky Spore when ingested in the grubs gut germinate, enter the blood and multiply.
    • The build up of spores causes the grub to have a milky white appearance.
    • Grubs continue to ingest the spore, become infected and die, each releasing 1 – 2 billion spores back into the soil.
      • Apply as labeled. May be purchased through biological mail order catalogs.
  • Beneficial nematodes actively seek out grubs in the soil.
    • The nematodes penetrate the grub releasing a bacteria.
      • This bacteria produces quickly feeding on the tissue of the grub.
      • The nematodes feed on the bacteria and continues their life cycle. They reproduce, release bacteria and kill the grubs.
      • Apply as labeled. May be purchased through biological mail order catalogs.

Both of the above methods are encouraged by the USDA and several well known universities as a safe and effective means to control Japanese beetles. These biological controls are species specific!! There are no other creatures affected by these methods.

Just remember you may have great prevention measures but your neighbors may not. Japanese beetles are with us for short 30 -50 day window. Killing them early may reduce the populations in your immediate area!

Birds are another way to deal with these nasty pests. They eat both the beetles and their grubs.

  • Bobwhite
  • Eastern Kingbird
  • Crows
  • Eastern Starling (I knew there must be something good about these birds)
  • Red-winged Blackbirds
  • Catbirds
  • Song Sparrows
  • Robins
  • Grackles (Again, I knew there must be something good about these birds!)

Sanitation is a wonderful way to rid your self of these pests. Clean up all debris around their favored plants. Till in the fall to expose the grubs for birds and other creatures to consume. Till again in the spring to again expose the pupae and emerging adult beetles.

Be diligent and decrease their surplus population!

Papa

For Great Kimchi You Need Chinese Cabbage!

I can hardly wait to make a batch of Kimchi (fermented Chinese cabbage and vegetables). The “Hilton” Chinese cabbage is ready to harvest. A few more ingredients and I’ll be ready to go.

WP_20150612_18_29_28_ProThe seedlings were started in early March.  They were transplanted into the hoop house the first week of April. Look at the results above! This Chinese cabbage is gorgeous!!!

WP_20150408_18_52_03_Pro         WP_20150512_19_06_54_Pro

WP_20150612_18_28_37_Pro

Brassica rapa sub. Pekinensis is the famed Napa cabbage used for stir fry, saute and Kimchi. Kimchi in its varied forms is a favorite of Korean cuisine. This spicy, highly seasoned fermented cabbage is a staple of the Korean diet. Plus, fermented foods are bursting with beneficial bacteria to boost digestive health.

The “Hilton” Chinese cabbage is an open pollinated variety. My observations of this Chinese cabbage indicate a vigorous growth similar to hybrids. It performs well in warm/hot weather. Other open pollinated varieties would have bolted (gone to flower) by now. It is truly a remarkable variety!!

“Hilton” Chinese cabbage may be obtained at Baker Creek Heirloom Seed Company. http://www.rareseeds.com/chinese-cabbage-hilton/

Enjoy!!

Papa

For Milkweed Go Native!!

It is very important that you supply the correct varieties of milkweed for your specific location.

Three-Amazing-Monarchs-on-Milkweed (1)

For instance, I live in the Missouri Ozarks. The recommended varieties are: http://www.xerces.org/wp-content/uploads/2013/07/Milkweeds-of-Central-US_plus-vendors_XercesSociety.pdf

  • Swamp Milkweed (Asclepias incarnata)
  • Common Milkweed (Asclepias syriaca)
  • Butterfly Milkweed (Asclepias tuberosa)
  • Whorled Milkweed (Asclepias verticillata)
  • Green Antelopehorn (Asclepias viridis)
  • Purple Milkweed (Asclepias purpurascens)

Sunset Flower AKA Scarlet Milkweed AKA Tropical Milkweed (Asclepias curassavica) is not recommended for a Monarch butterfly larval plant in North America. Tropical Milkweed is native to South America. It is now becoming an invasive species in the southern states of America. The Monarchs that consume this variety become prey to additional parasites. Subsequently, this variety weakens the larvae and butterfly. Lastly, the Monarchs are not migrating to Mexico because they have a constant supply of the wrong food.

Check out these links for native milkweed in your area:

http://www.xerces.org/wp-content/uploads/2011/03/xerces-nrcs-california-milkweed-guide.pdf

http://www.xerces.org/wp-content/uploads/2011/03/NativeMilkweedsGreatBasin.pdf

http://www.xerces.org/wp-content/uploads/2011/03/SE-Monarch-milkweed-butterfly-host-plant-brochure-final-2012.pdf

http://www.xerces.org/wp-content/uploads/2014/03/Monarch-Butterflies-East-Region.pdf

http://www.xerces.org/wp-content/uploads/2015/03/Monarchs-Milkweeds_Northern_Great_Plains.pdf

Don’t forget nectar producing plants for your Monarchs as well. Some of their favorites include:
Buckwheat (Eriogonum)
Butterfly Bush (Buddleia)
California Lilac (Ceanothus)
Citrus (Citrus)
Coneflower (Echinacea)
Coreopsis (Coreopsis)
Cosmos (Cosmos)
Daisy (Aster and Chrysanthemum)
Dianthus (Dianthus)
Heliotrope (Heliotropium)
Lantana (Lantana)
Marigold (Tagetes)
Milkweed (Asclepias)
Pincushion Flower (Scabiosa)
Rabbit Brush (Chryssothamnus)
Rock Cress (Arabis)
Salvia (Salvia)
Senecio (Senecio)
Star Clusters (Pentas)
Sweet Alyssum (Lobularia)
Verbena (Verbena)
Wall Flower (Erysimum)
Zinnia (Zinnia)

Papa

Got Milkweed? You’ll get Monarchs!!

Kathy, a friend at work, dug up three native plants of Milkweed (Asclepias purpurascens) from her farm. They were given to me to transplant on my property. The Purple Milkweed will be used to attract the Monarch butterfly. The plant itself is the larval food for the Monarch. WP_20150601_19_31_48_Pro         WP_20150601_19_32_00_Pro

WP_20150601_19_32_34_Pro

These hardy perennials flower from late May through July. The flowers are adored by many different species of butterflies and moths. I have observed butterflies waiting their turn to enjoy the nectar from these unusual flowers. Monarch numbers are decreasing which makes the planting of milkweed essential. Monarch populations have decreased by 90%. All the more reason to plant milkweed on your property!! Indiscriminate use of herbicide and mowing of roadsides has eliminated much needed plantings of milkweed. A 3′ x 3′ planting of milkweed will go a long way to help the beautiful Monarch butterfly.

Monarch larvae          monarch-butterfly-wallpaper---1920x1200

Monarch on milkweed

It is wise to collect seeds from your milkweed plants instead of digging them up. Existing plants are established and should be allowed to produce more seed to be released. Nothing could be easier! After the flowers are pollinated, wait for the seed pods to mature and start to open. Cut off a few of the seed pods and place in a paper bag. The seed will fall to the bottom of the bag. Collect the seed and place in a dated, labeled envelope.

Swamp_Milkweed_Asclepias_incarnata_Pods              Swamp_Milkweed_Asclepias_incarnata_'Ice_Ballet'_Open_Pods

Milkweed-in-seed2

Let’s do all we can to insure the protection of the milkweed plant for the survival of the Monarch butterfly!!

To purchase milkweed seed, please check out these links:

http://www.rareseeds.com/milkweed-butterfly-weed/

http://www.rareseeds.com/milkweed-mexican-whorled/

http://www.rareseeds.com/milkweed-red-or-swamp/

Papa

Questions About Biological Worm Spray (Bacillus thuringiensis var. kurstaki)

I get many questions regarding the use of biological caterpillar (worm) spray. There are many misconceptions about how this valuable tool is used. Let’s clear the air! Bacillus thuringiensis var. kurstaki or Bt was discovered back in 1901. The name of the bacteria was given in 1911. I’ll not bore you with the rest of the history.

Suffice it to say, due to the use of synthetic pesticides, many were concerned about the toxicity and environmental issues. Fast forward to the 1980s. Bt became essential as an alternative to toxic pesticides. The effectiveness of Bt is remarkable to say the least. The bacteria with its crystalline toxins attack the gut of caterpillars and destroy the creature from within. When used on a frequent basis, it is almost 100% effective. It is totally safe for humans, pets, birds, fish, pollinators and beneficial insects. Bt may be sprayed up until the time of harvest!! Bt is no longer viable or effective after continued exposure to ultra-violet light and water.

The greatest misconception involves the insertion of the Bt genetic material into the seed germ. The Bt GMO* ready corn or potatoes has Bt as an internal mechanism to kill caterpillars. The agri-business companies use other genetic materials (from other bacteria and viruses) to potentiate the Bt gene. This really is scary stuff!!!

The externally sprayed Bt material is completely safe. It is not systemically part of the plant. Whereas, a Bt GMO* ready crop has the insecticide in all parts of the plant. This GMO creation was made for convenience and to save money. No one can say for sure what are the long term effects!!!

I started using Bt in 1978. Up until that time, my broccoli plants were full of caterpillars. I remember being served some broccoli, only to find dead worms on my plate. Ugh, nasty! Once I used Bt, there were no more worms!!! It really does work!! Plus, it is very cost effective and safe to the environment.

*GMO – Genetically Modified Organism – “A GMO is a plant or animal that has been genetically modified through the addition of a small amount of genetic material from other organisms through molecular techniques. Currently, the GMOs on the market today have been given genetic traits to provide protection from pests, tolerance to pesticides, or improve its quality. Examples of GMO field crops include Bt-potatoes, Bt-corn, Bt-sweet corn, Roundup Ready soybeans, Roundup Ready Corn, and Liberty Link corn.” University of Kentucky Entomology

Papa

Beets from the Hoop House Two Weeks Early!

Garden beets grown in a hoop house are ready to harvest two weeks before those grown outside. The beet plants and beets are more tender. The protection from the outside elements accelerate the growth for an early crop.

Hoop HouseWP_20150519_19_14_50_Pro

WP_20150519_19_18_07_Pro                     WP_20150518_18_51_58_Pro     WP_20150518_18_52_23_Pro              WP_20150518_20_10_35_Pro

The beauty and flavor of these beets are unbeatable (excuse the pun!)!!

Papa

There are White Spots on my Peas! Uh Oh, it’s Powdery Mildew!

The daytime temperatures are getting warm and it’s cool at night. It seems like the perfect scenario for great growing weather. Your peas are up and growing like a storm. What’s that on the leaves and pods? There are white fuzzy spots growing on my peas. Powdery Mildew strikes again!!

peapm

Powdery mildew is the most common occurring plant fungal disease. Its appearance, when first noticed, is characterized by spots or patches of white to grayish powdery growth on the upper surface of leaves and their stems.

  • It impairs photosynthesis
  • Stunts growth
  • Increases the rate of plant decline

Advanced stage of powdery mildew:

  • Foliage turns to yellow, leaves curl or turn brown.

D-TO-LTAU-FO.001h        D-SP-EPOL-FR.001h

How does this happen? There are three requirements for disease to flourish. A host, the pathogen/disease and the right environmental conditions.

  • Powdery mildew (thin layers of fungal tissue on the surface of the leaf which produce spores) requires new and young living plant tissue to grow.
    • The disease grows as mycelium (fungal tissue) on the surface of the affected plant as white patches where the spores are produced.
      • Spores make up the white/gray powdery growth visible on the leaf surface.
      • Spores  of powdery mildew are carried by the wind, splashing rain drops and/or insects to new plant tissue.
      • The spores can produce in 48 hours.
  • Warm, humid days and cool nights are the perfect conditions for the fungus to grow.
    • Moderate temperatures of 60° to 80° (F) are favorable temperatures for powdery mildew growth.
    • Temperatures of 90° (F) and above inhibits the growth of the disease.
  • High humidity for spore germination common in crowded plantings, where air circulation is poor and damp shaded areas invite this plant fungal disease.
  • Crop debris and host weeds are important to the survival of powdery mildew.
  • The spores of powdery mildew over winter attached to plant parts and plant debris.

These are the common preemptive strategies to avoid/combat powdery mildew.

  • Plant powdery mildew resistant varieties if available.
  • Plant in full sun.
  • Properly space plantings to allow good air circulation.
    • If plants are overcrowded, prune to allow increased air circulation, reduce humidity and cross infection.
  • Arrange your rows or beds east to west to eliminate shade possibility.
  • Tallest plantings should be to the north.
  • Avoid overhead watering. Best time to water is mid morning allowing the plants to completely dry.
  • Stay out of the garden when wet!!! Otherwise, you become a carrier of the disease.
  • Avoid the late summer application of nitrogen fertilizer (fish emulsion, composted poultry litter, ammonia nitrate, urea) which limits new growth the disease attacks.
  • Remove ALL diseased plant parts and burn or bag and remove from property.
    • If possible, remove diseased plant parts on a sunny, hot, wind free day.
      • Spores are killed by heat and direct sunlight.
      • In the absence of wind there is less of a chance for spore dispersal.
  • Remove ALL plant material and plant debris (mulch included) in the fall.
    • Survival rate of any overwintering fungal spores is decreased.
  • DO NOT COMPOST ANY PLANT MATERIAL OR DEBRIS where this disease was active.

When fungus pressure/threshold is too great you can pull all diseased plants or are there fungicides to use? The answer is YES!!

  • Horticultural oils – Saf-T-Side Spray Oil®, Sunspray Ultra Fine Spray Oil® – follow label directions
  • Plant Based Neem Oil (Amazon Link), Plant Based Jojoba Oil (Amazon Link) – follow label directions
    • Never apply when temperatures are 90° (F) or above or with drought stressed plants.
    • Never apply an oil spray within two (2) weeks of a sulfur application as plants may be damaged.
  • Wettable Sulfur is most effective when applied before disease symptoms appear. – Safer Garden Fungicide® (Amazon Link) – follow label directions
    • Never apply when temperatures are 90° (F) or above or with drought stressed plants.
    • Never apply within two (2) weeks of an oil spray.
    • Be careful when spraying squash and melons as there may be damage.
  •  Sodium Bicarbonate (Amazon Link)
    • Combine with horticultural/dormant oil with liquid/insecticidal soap
      • 1 TBS Baking Soda, 1 tsp horticultural/dormant oil, 1 tsp insecticidal/liquid soap to 1 gallon of water.
      • Spray every one to two weeks.
      • Use sparingly to avoid sweetening (alkaline) the soil.
  • Potassium Bicarbonate – Kaligreen® – contact fungicide killing spores of powdery mildew quickly.
    • Approved for organic use. Follow label directions.
  • Mouthwash – generic ethanol based – spray 1 part mouthwash to 3 parts water.
    • Caution use on new foliage as it may be damaged.
  • Vinegar – spray 2 -3 TBS apple cider vinegar (5% acetic acid) mixed with 1 gallon water.
    • Caution use on new foliage as it may be damaged.
  • Milk – natural occurring compounds in milk attack the disease while improving the plants immune system.
    • Spray 1 part milk to 2 parts water weekly.

Biological Fungicides – beneficial microorganisms when sprayed on plant tissue destroy fungal disease. Serenade®, Actinovate SP® (Amazon Link), Cease®

  • Active ingredient  – Bacillus subtillis – prevents powdery mildew from infecting the plant. Follow label directions.
    • Non toxic to people, pets and beneficial insects
      • Not proven to be as effective as oils or sulfur

Here are a few examples of powdery mildew.

powdery_mildew_tomatoes      carrot-powdery-mildew-1L

9-4PM-on-grape-leaves-1ANNEMIEK (1)       PMSquashBHedlundHerndonVA2006-1y47tkc

PM watermelon

Remember, fall clean-up is essential!! Be on your guard!

Papa